Shane AO Startup Procedures
Shortcuts to various procedures:
Cabling/Power | Ethernet |
Servers |
Power GUI | Motor GUI |
SAO UI | Peeko |
TT Peeko | SAO Initialization |
ShARCS Setup |ShARCS GUIs |
Laser Shutdown Monitor | Startup Checklist
Cabling and powering up the instrument.
Assuming that everything was properly cabled up in the lab and that it has been mounted properly to the Shane 3-m Telescope, there are only five cables that need to be connected for the Shane AO (SAO) instrument:
- Ethernet Cable - This cable must be connected to the gigabit network.
- Power Cable 1 - Plugged into the UPS protected outlet on the TUB labeled AO Only. SAO Pulizzi B and C are powered from this outlet.
- Power Cable 2 - Plugged into the non-UPS protected PG&E power outlet on the TUB. SAO Pulizzi A is powered from this outlet.
- Two regular BNC cables from the PI uplink tip/tilt mirror power supply to the ShaneAO instrument. X-axis is a black BNC cable, Y-axis is a green BNC cable.
When the Pulizzis are powered on they are set to turn on the following items immediately:
Pulizzi A:- [A1] Galil DMC 40x0 motor controllers (3)
- [A2] 24V brake power supply
- [A3] 24V motor power supply
- [A4] 5V DC logic power supply
- [A5] +/- 12V servo power supply
- [A6] Jade card 5V power supply (ShARCS)
- [A7] Stealthie (ShARCS computer)
- [A8] Ion pump (ShARCS)
- [B1] rtc/real (computer)
- [B2] musher (computer)
- [B3] TT camera
- [B4] WFS camera
- [C1] TT filter wheel
- [C2] ShARCS filter wheel (external, not currently installed)
- [C3] Lantronixes (TT f/w ShARCS f/w, ion pump)
- [C7] Galil 7
Checking Ethernet Communications
You should be able to ping the following computers, Lantronixes, etc. that are on the SAO instrument:
- real (real time control computer, RTLinux, 128.114.176.200)
- musher (woofer control computer, Windows, 128.114.176.202)
- stealthie (ShARCS detector control computer, Windows, 128.114.176.206)
- ao-lantr-ip (ion pump lantronix, 128.114.176.168)
- ao-agilent (ShARCS Agilent temperature controller, 128.114.176.179)
- ao-serial-1 (TT filter wheel lantronix, 128.114.176.208)
- ao-serial-2 (ShARCS external filter wheel lantronix, 128.114.176.209)
- saorouter (router for galils, 128.114.176.207)
- ao-power-1 (Pulizzi #1, 128.114.176.225)
- ao-power-2 (Pulizzi #2, 128.114.176.226 - note AO will operate if can't ping this device)
- ao-power-3 (Pulizzi #3, 128.114.176.227 - note AO will operate if can't ping this device)
- mh-switch-ao (AO main ethernet switch, 128.114.176.118)
The following are not used in regular operations, but are in the AO bench:
- ao-windows (flea camera control computer, Windows, 128.114.176.66 -- Note this laptop may need its lid lifted before you can ping it or log in remotely.) Note2: This laptop has been removed from the SAO system and put in storage.
- ao-flea (Flea camera, 128.114.176.62)- Note this item is not currently connect to power. Its IP has been reassigned to another project.
- ao-pico-1 (pico controller, 128.114.176.228) - Note this item is not currently connected to power. Its IP has been reassigned to another project.
The following computers are not on the instrument but are used for SAO and ShARCS operation:
- shanevnc (VNC servers, most front end GUIs, 128.114.176.21)
- karnak (peeko, ttpeeko, imageSharpen, 128.114.176.47)
- shimmynova (peeko, ttpeeko, imageSharpen, 128.114.176.115)
- covert (ShARCS user interface, 128.114.176.205)
- shark (sharcstherm dispatcher, 128.114.176.99)
- shadow (motor dispatchers, power dispatcher, 128.114.176.114)
- accession (keyword history, 128.114.176.11)
Starting Server Software
There are lots of pieces of software that do many different things. The servers are generally already running, most starting at boot time. For the most part you don't need to start most servers individually, but can start them all by typing the following command (if a service is already running, the script will do nothing for that item):
/usr/local/lick/bin/ao start
on hosts shark, shadow, and covert. The services on real (saocon) and musher (woofer) should start at boot time or when starting the realtime code. More details about starting individual components are below.
Power Server
The power dispatcher runs on host shadow and can be started with the command:
/usr/local/lick/bin/ao start saopower
Motor Servers
The motor dispatchers run on host shadow and can be started with the command:
/usr/local/lick/bin/ao start saomot
If you need to only start a particular motor dispatcher, the command is:
/usr/local/lick/bin/ao start saomot1
or saomot2, saomot3, saomot4 (or rio), saomot5, or saomot7.
Motors controlled from each dispatcher (in Galil channel order ABCDEFGH):
- saomot1: FOLD1RX, FOLD1RY, WPLATEROT, WPLATINS, TTCamY, TTCamX, Lenslet
NOTE: WPLATEROT and WPLATINS are not currently installed. TTCamY and TTCamX are currently out being repaired. - saomot2: STEER2RY, STEER2RX, STEER1RX, STEER1RY, TTDICHR, CALY, WFSDICHR, WFSFOCUS
NOTE: STEER and WFSFOCUS are no longer installed or used. - saomot3: CALX, NotUsed, NotUsed, NotUsed, DWAPER, DWFILT1, DWFILT2
- saomot4: RIO controller for laser uplink TT mirror and Sodium Filter.
- saomot5: TT filter wheel, ShARCS external filter wheel
- saomot7: WFSCamY1, WFSCamY2, WFSCamY3, NotUsed, WFSCamX, WFSCamFoc, NotUsed
Calibration samp state is monitored by saomate and runs on shadow. It is started with the command:
/usr/local/lick/bin/ao start saomate
ShARCS World Coordinate System
The ShARCS World Coordinate System server, shawcs, also runs on shadow and can be started with the command:
/usr/local/lick/bin/ao start shawcs
Instrument Monitoring Servers
There are two monitoring programs, saomon1 and saomon2. saomon1 is the Primary Monitor (everything except the heartbeat monitor) and saomon2 is the Heartbeat monitor for the MEMS DM. They are started on host shadow with the command:
/usr/local/lick/bin/ao start saomon
or saomon1 or saomon2 if you wish to start them individually.
Keyword History Server
The AO keywords are written to accession so a history of state and changes can be saved. The status of the aohistory service can be checked by logging onto accession and executing the following command:
/usr/local/lick/etc/init.d/ao_keygrabber status
To start the service type:
/usr/local/lick/etc/init.d/ao_keygrabber start
ShARCS Services
There are a number of services that help with the operation of ShARCS. On host: covert, the relevant programs are sharcspump, ao_keyheader, and sharcs. All are started on host covert with the command:
/usr/local/lick/bin/ao start
or individually by typing:
/usr/local/lick/bin/ao start sharcspump
or ao_keyheader or sharcs.
sharcspump controls the ion pump for the ShARCS dewar. ao_keyheader facilitates adding information to ShARCS FITS headers, and sharcs governs the communications between stealthie and covert for ShARCS detector operation.
Additional ShARCS services run on host shark. mako, which governs communications between ShARCS and SAO. mako is started with the command:
/usr/local/lick/bin/ao start mako
Temperature monitoring, sharcstherm, runs on shanevnc and be started with the following command:
/usr/local/lick/bin/ao start sharcstherm
Starting AO Software User Interfaces
Power GUI saopower_ui
The power control GUI is started with the command
/usr/local/lick/bin/saopower_ui
After starting the GUI, make sure that the items turned on by default when the Pulizzi are powered up are on and that the others are off.
Motor Control GUI saomot_gui
To start the motor control GUI, type
/usr/local/lick/bin/saomot_gui
Once the GUI is up, the stages will all need to be calibrated. Stages can be calibrated one at a time by clicking the Calibrate button in the motor's detail panel or all at once using the Actions - Calibrate - All Stages menu item. Calibrating all at one time is not recommended at this time because the TT Cam X, TT Cam Y, Sci filter, and Waveplate motors are currently not installed.
Problems can occur with homing and there are known ways to deal with them as follows:
- TTCamX and TTCamY: These motors are not currently installed and locked out in the the software. These stages use brushless motors and have to
move significant weight against gravity. This means that sometimes
the stages won't home. If there is a problem homing, the first think
to try is just pushing the Calibrate button again. If that fails,
do the following procedure:
- Turn the TTCamX motor on:
modify -s saomot ctrl1aux='MG_BXF'
Then release the brake:
modify -s saomot ctrl1aux='BZF=-4'
Next push the Calibrate button again and it should home. - Turn the TTCamY motor on:
modify -s saomot ctrl1aux='MG_BXE'
Then release the brake:
modify -s saomot ctrl1aux='BZE=-4'
Next push the Calibrate button again and it should home.
- Turn the TTCamX motor on:
- FOLD 1 Rx and FOLD 1 Ry rarely have problems homing, but if
there is a problem, do the following:
- In the motor's detail panel set the mode to Jog ENGR.
- Set the speed to 2000.
- Wait for the motor to hit its forward limit.
- Push the Calibrate button.
- TT filter may give an error about the controller being non-responsive, e.g.
unable to successfully issue command: 'pos=2'
The solution is to cycle the filter wheel's power in the saopower_ui outlet C1. Then try moving to another filter (it may take more than one move to get communications established again). - Cal X may not find its index mark, giving the error "decel or stop due to REV limit switch". Solution is:
- Go to SAO and push on the stage perpendicular to its travel direction.
- Push the Calibrate button.
- WFS Y has absolute encoders, so homing is simple as the stage
doesn't move in the process, but it is possible that the three Y
motors get out of alignment with each other and will need to be
moved independently. The unfortunate side effect of when the WFS
Y motors halt due to misalignment is that the WFS X and WFS Focus
motor will also halt. To restore alignment between the Y motors
do the following:
- Go to https://mtham.ucolick.org/ShaneAO/saomot7/. This web site is password protected, so you'll need to use your mtham web access credentials.
- Look at the WFS Cam Y section's second to last column
to determine the Y1-Y2 and Y1-Y3 values. If either is over
500 you'll need to change the Xmaxdif value (from shark or
shred):
saomot.io ctrl7aux='Xdifmax=1000' - In the WFS Cam Y section, at the lower left, change Assembly to Unlinked.
- Change to Pos Mode.
- Turn motor on.
- Move a misaligned motor (either Y2 or Y3) a small amount (e.g. 100 counts) to make sure the motor is moving and moving in the right direction. I.e. if Y1-Y3=-350 the direction and amount to move Y3 is -350 to get back in alignment. If the small move is successful, complete the move so that the difference is 0.
- Repeat above for the other axis if necessary.
- Change Assembly back to Linked.
- Set Xdifmax back to 500:
saomot.io ctrl7aux='Xdifmax=500' - Move WFS Y stage to desired position.
- For both WFS X and WFS Focus, set mode back to POS and turn the motors On. Then set them back to the desired positions.
Once stages are calibrated, they should be moved to the nominal, on-axis positions shown in Figure 1.
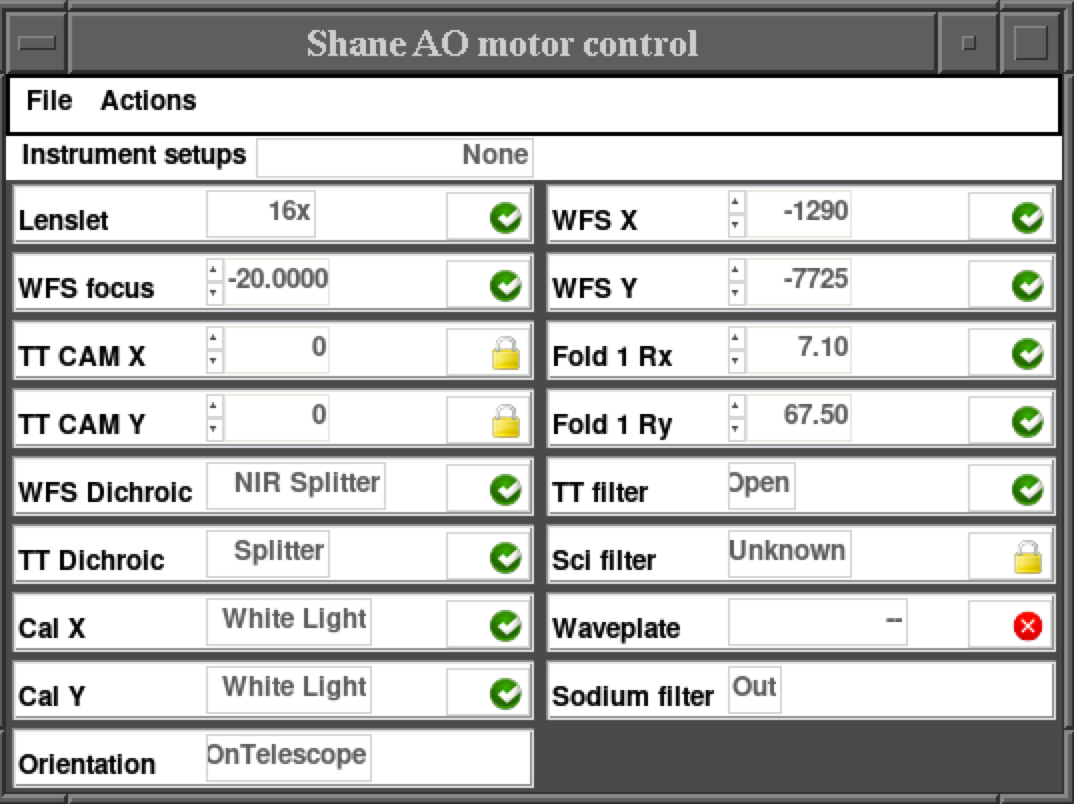
Also be sure to set the Orientation to "OnTelescope" when mounted on the Shane or "Stow(Z)" when in the lab.
Starting Shane AO UIs
At this time there are few UIs for SAO operation, so many things need to be started and run from command line interfaces. Short list of items is:
- system message log - monitoring system
- shaneao - main real time control interface
- saocon_gui - SAO control GUI
- peeko - WFS and DM display GUI
- ttpeeko - TT Camera display GUI
- fieldsteer.tcl - Field steering GUI
Message Log
Before starting the shaneao realtime control code, start monitoring real's message log so you can monitor the state of the system. To view the message log, log into real as user and type the following:
tail -f /var/log/messages
Pay close attention to this log as important errors about DPIO2 will be shown there.
Realtime Code shaneao
Now the realtime SAO control code can be started on real from the user account with the following command:
/usr/local/lick/bin/shaneao
Once the program starts you will see the following information if all is normal.
DPIO2:  DPIO2 Device Driver - Release: 2.4.13
        Copyright (C) 2005 - VMETRO, Inc.  All rights reserved.
        Creation Date: Apr 21 2014, Time: 16:07:22
DPIO2:  Scan PCI for DPIO2 modules. Found 1
DPIO2:  Device #1 (bus 55, device 9) is a DPIO2-LB with FPGA code BO514
The software should automatically check to make sure things are normal and can start. If not or if you get a vastly different message, either there is already a shaneao running (only one can run at a time) or there may be a problem with communicating with the DPIO2 MEMS driver (in which case a reboot of real might be necessary). In either case you'll want to exit shaneao at the prompt.
Another error that shows up in the Message Log is
Aug  1 11:05:59 real kernel: last message repeated 14476 times
Aug  1 11:07:00 real kernel: last message repeated 14475 times
Aug  1 11:08:01 real kernel: last message repeated 14476 times
which indicates a problem and will result in poor performance of the SAO system. The recommended solution is to exit shaneao at the prompt and restart it.
SAO realtime control GUI - saocon_gui
The SAO realtime loop control GUI, saocon_gui, runs on shanevnc from the user account. To start it type
/usr/local/lick/bin/saocon_gui
WFS Display peeko
From the user account on karnak, the WFS and DM actuator displays are started with the following command:
/home/user/peeko_start
TT Camera Display ttpeeko
From the user account on karnak, the TT Camera display is started with the following command:
/home/user/bin/tpeeko_start
Field Steer software
From user@shanevnc, the field steering GUI is started with the following command:
/usr/local/lick/bin/fieldsteer.tcl
Initializing ShaneAO
Now that all the software is started, it is ready for use. Issue the following command to initialize shaneao and move the lenslet array:
init(16) for the 16x lenslet, or
init(8) for the 8x lenslet.
If the above init command fails (which is extremely unlikely), you need to do the following:
- Start the WFS camera:
camstart() - Start the TT camera:
ttcamstart() - Read frame rate of WFS camera:
rate() - Read frame rate of TT camera:
ttrate() - Examine the state to see what might need to be changed:
state()
After initializing, a common issue is the WFS Camera will not initialize, and you'll see a pdv error every second in the shaneao window and the test pattern will be shown in the Peeko display. First try pushing the "WFS Camera Reset" button. If that fails to initialize communication, power cycle the WFS camera (leaving it off ~20 seconds). It sometimes requires more than one power cycle and "WFS Camera Reset" button press to resolve the issue.
At this point the realtime code is ready to use and the woofer and tweeter DMs can be turned on. The woofer is turned on via the saopower_ui GUI outlet B5. Before turning on the tweeter, check the message log on real to make sure there are no SW-IOMMU error messages. The tweeter MEMS mirror is turned on via the saopower_ui outlet B6.
At this point you can turn on the woofer and MEMS in the shaneao software with the following commands:
- Turn on the woofer communications:
woof('on') - Turn on the tweeter (MEMS) communications:
mems('on')
Starting ShARCS
Before starting the ShARCS detector control software, you'll want to make sure stealthie has crossmounted covert's data disk by doing the following procedure:
- rdesktop stealthie and log in as user
- Click on the "My Computer" icon.
- Click on "public on 'Samba... Network Drive" and make sure it lists the data directories on covert
Information on starting ShARCS detector control software on stealthie is available in: HxRG_CustomManual_WeissMod_v3.pdf. Note: Replace HxRG2_3 with Test in step 10 of these directions to select the Test.soln file.
Start temperature and pressure monitoring through saomon with the following commands if not already set:
modify -s saomon SH_BASICDIS=0
modify -s saomon SH_COMBODIS=0
Starting ShARCS GUIs
There are a few user interfaces for ShARCS:
- sharcs_fe - Main GUI for taking exposures.
- sharcsdisplay - Image display interface.
- saowheels_gui - ShARCS aperture and filter wheel control GUI.
- scriptproc.tcl - Script running GUI.
- eventsounds - GUI to set and play sounds for ShARCS exposure events.
- sharcspump_gui - Ion Pump UI.
Detector Controller sharcs_fe
The main GUI for taking exposures, sharcs_fe is started on covert with the following command:
sharcs_gui
or if that fails, one can type java -jar /usr/local/lick/java/jar/sharcs_fe1.jar
Once the GUI is started, open Windows - Setup and do the following:
- Make sure AsicCfg is C:\startup\SHARCSColdControlConfig.xml
- Make sure UnixRootDir is /data
- If Connected is NO or if the upper right corner of sharcs_fe is red and says "Lost Server", press the Connect button.
- Initialize system by pressing the Init button. Initing status will change to Yes during the initialization and SideCarInit should say Success! when done (and Initing status will change to No).
Note, there is no harm in pushing the Connect button if you are already connected, but if you do, you must then press the Init button.
Image Display sharcsdisplay
The image display software is started on covert with the command
/usr/local/lick/bin/sharcsdisplay
Filter Wheel Controller saowheels_gui
The wheel and aperture wheel motor controller is started on covert or shanevnc with the command
/usr/local/lick/bin/saowheels_gui
Once the GUI is up, calibrate each of the three wheels by clicking Calibrate on its detail panel. Now the filters can be moved to the desired positions.
Script Tool scriptproc.tcl
The script running GUI is started on covert with the command
/usr/local/lick/bin/scriptproc.tcl
Sound GUI eventsounds
The eventsounds GUI can be started on any of our user computers (e.g. shanevnc) with the following command:
/usr/local/lick/bin/eventsounds -a sao
Ion Pump GUI sharcspump_gui
ShARCS ion pump control GUI is started with the command
/usr/local/lick/bin/sharcspump_gui
Once the GUI is started, the high voltage power supply, HV needs to be turned on.Starting Laser Shutdown Monitor
The laser shutdown monitor runs on shanevnc and is started with the command
/usr/local/lick/bin/LSM.tcl
Once started, select the proper directory and laser target.
Starting the Laser Offload GUI
The laser offload monitoring GUI runs on shanevnc and is started with the command
/usr/local/lick/bin/laserOffload.tcl
Starting AO telescope position GUI
The AO version of the telescope position GUI run on shanevnc and is started with the command
/usr/local/lick/bin/aopococ
Startup Checklist
- Mount SAO on TUB.
- Connect 2 power cables.
- Connect 1 ethernet cable.
- Connect 2 laser uplink BNC cables.
- Turn on ion pump HV supply.
- Ping real, stealthie, musher, covert, shadow, and karnak computers. Assume other devices (lantronixes, routers, etc.) are also up if these few computers ping.
- Do ao start on covert, shadow, and shark.
- Start saopower_ui on shanevnc.
- Check that appropriate items are turned on.
- Start saomot_gui on shanevnc.
- Calibrate motors.
- Set motors to nominal positions (choose the most recent default setup on shanevnc: /u/user/observers/lgs/saomot_setups).
- Start ShARCS detector software on stealthie.
- Start tail -f /var/log/messages on real.
- Start shaneao
- Start saocon_gui on shanevnc.
- Start peeko on karnak or shimmynova.
- Start ttpeeko on karnak or shimmynova.
- Initialize shaneao: Type init(16) (or 8) in shaneao, or click Actions - Init 16 (or 8) in saocon_gui.
- Turn on power to Woofer (B5) and Tweeter (B6) if there are no SW-IOMMU errors in the message log.
- Start sharcs_fe on covert.
- In sharcs_fe Windows - Setup, check parameters, connect, and initialize.
- Start sharcsdisplay on covert.
- Start saowheels_gui on shanevnc or covert.
- Calibrate wheels if necessary and set to desired positions.
- Start scriptproc.tcl on covert.
- Start eventsounds on shanevnc.
- Start sharcspump_gui on shanevnc.
- Start fieldsteer.tcl on shanevnc.
- Start aopococ on shanevnc.
- Start LSM.tcl on shanevnc if using laser.
- Start laserOffload.tcl on shanevnc if using laser.
- start saoWFSFocusTrack.tcl on shanevnc if using laser.
- Start saomon_gui on shanevnc.